4. Writing the Silverlight WebPart
As usual, start Visual Studio 2010. Create a new project, but this time create a Silverlight application project and call it SLScheduler.
As soon as you create the SLScheduler project, Visual Studio will ask
you how you intend to debug your Silverlight application. In certain
situations, I have found it useful to have a separate ASP.NET web
application project. So usually I go ahead and generate the
SLScheduler.Web web application project.
In the same solution, go ahead and add an empty SharePoint project and call it Scheduler.
I would love to be able to say that this should be a sandbox solution,
but unfortunately it cannot be because the WebParts you will write
intend to communicate with each other. This communication is done
through WebPart connections, and WebPart connections internally use
reflection, so they are not allowed in sandbox solutions. So choose this
to be a farm solution.
The Silverlight XAP file will be generated out of the
SLScheduler project. The Scheduler SharePoint project will deploy the
XAP file into SharePoint as a module. Add a SilverlightXAP module into
your Scheduler SharePoint project. In order to automatically copy the
XAP file from the SLScheduler project into the SharePoint Scheduler
project, right-click Properties on the SLScheduler project, and under
Build Events in the Post-Build Event command line, add the following
command:
copy $(TargetDir)\SLScheduler.XAP $(SolutionDir)\Scheduler\SilverlightXAP
The above command will ensure that the XAP file is
copied into your Scheduler SharePoint project. It is still not however
included in the final packaged solution. For it to be included in the
final package solution, build the SLScheduler project once, so the XAP
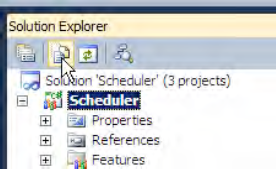
file is copied over to the SilverlightXAP folder. Then click the Show
All Files button in the Visual Studio Solution Explorer toolbar, so you
can see the SLScheduler.XAP file (see Figure 1).
With the SLScheduler.xap file visible, right-click
the SLscheduler.xap file and choose to include it in your project. While
you're at it, go ahead and delete the sample.txt file as well. Finally,
ensure that the elements.xml file looks like Listing 5.
Note that you don't have to make this change; Visual Studio should have
edited the elements.xml for you soon as you included the
SLSCheduler.XAP file in your project.
Example 5. The Elements.XML File to Deploy the Module
<?xml version="1.0" encoding="utf-8"?>
<Elements xmlns="http://schemas.microsoft.com/SharePoint/">
 <Module Name="SilverlightXAP">
  <File Path="SilverlightXAP\SLScheduler.xap" Url="SilverlightXAP/SLScheduler.xap" />
 </Module>
</Elements>
|
Now in the same SharePoint project, add a feature
called Scheduler. Using the feature designer, include the module shown
previously as a part of the feature. Make sure that the feature is
scoped to site collection or higher because you are next going to add a
WebPart into the same project, and WebParts cannot be added to features
whose scope is lower than a site collection. The responsibility of this
WebPart would be to download and run the SLScheduler.XAP file within
SharePoint. There is an out-of-the-box Silverlight WebPart as well.
While you could use that for simplistic cases, in this particular
scenario, I intend to add postbacks free WebPart communication, which is
why I am choosing to create my own WebPart.
So go ahead and add a new WebPart called
ScheduleOverview. Also include the ScheduleOverview WebPart to be
deployed by the Scheduler feature.
Your project structure is now set up.
In short, you created a solution with a Silverlight
project and a SharePoint project. The SharePoint project includes a
Scheduler feature. The Scheduler feature includes a ScheduleOverview
WebPart and a SilverlightXAP module. The Silverlight project copies the
XAP file into the proper module location in the SharePoint project.
Your project structure should now look like Figure 2.

With the basic structure of your project set up, it
is time to write some code. There are two places where you will need to
write code. The first is the WebPart itself. The WebPart is rather
simple and simply downloads and displays the XAP file from a well known
URL. The code can be seen in Listing 6.
Example 6. Code for the ScheduleOverView WebPart
public class ScheduleOverView : WebPart
{
  protected override void RenderContents(HtmlTextWriter writer)
  {
    StringBuilder sb = new StringBuilder();
    sb.AppendLine("<object style=\"display:block\" data=\"data:application/x-Silverlight-2,\"
type=\"application/x-Silverlight-2\" width=\"600px\" height=\"500px\">");
    sb.AppendLine("<param name=\"source\" value=\"/SilverlightXAP/SLScheduler.xap\" />");
    sb.AppendLine("<param name=\"onError\" value=\"onSilverlightError\" />");
sb.AppendLine("<param name=\"initParams\" value=\"MS.SP.url=" + SPContext.Current.Site.Url + "\" />");
    sb.AppendLine("</object>");
    writer.Write(sb.ToString());
    base.RenderContents(writer);
  }
}
|
As you can see, this code is rather simple; it just
renders out an object tag into the HTML. Silverlight in a browser is
just an object tag that loads the necessary ActiveX control to run the
Silverlight application. Most parameters are quite straightforward, but
of special mention is the initParams parameter for the Silverlight
object. Specifically, we are using a special variable name called
MS.SP.url to pass in the URL for the current running site. This is
necessary for the client object model to get a handle to
ClientContext.current. This is something that you didn't have to do in
the previous .NET examples of the client object model because all those
.NET examples were running as a separate exe outside of SharePoint. In
this case, however, your Silverlight application is running within the
context of SharePoint, so you shouldn't create a client context if you
don't need to. Instead, you should try and hook into the
ClientContext.Current.
Next, let's start writing the Silverlight application
itself. The Silverlight application is going to read appointments out
of an appointments list based on the calendar template. It will read
this data using the client object model. It will then present the data
in a visually appealing manner. I'm using the telerik RADScheduler
component, but you can choose to render the content in any manner you
wish. The final result is still a XAP file, which is easy to deploy and
run.
In order to use the client object model from the
Silverlight application, add references to the following two DLLs in
your Silverlight project:
These DLLs can be found in the 14\TEMPLATE\LAYOUTS\ClientBin folder.
In order to use Telerik's controls, you will need to download and install the Silverlight suite from its website at http://www.telerik.com. You would then need to add references to the Telerik.Windows.Controls and Telerik.Windows.Controls.Scheduler dlls.
With the references in place, let's start writing the code for the Silverlight application. The XAML code can be seen in Listing 7. As you can see, I've declared an instance of RadScheduler, which I am using in a read-only form.
Example 7. MainPage.XAML Code
<UserControl
  xmlns:my="clr-
namespace:Telerik.Windows.Controls;assembly=Telerik.Windows.Controls.Scheduler"
  x:Class="SLScheduler.MainPage"
  xmlns="http://schemas.microsoft.com/winfx/2006/xaml/presentation"
  xmlns:x="http://schemas.microsoft.com/winfx/2006/xaml"
  xmlns:d="http://schemas.microsoft.com/expression/blend/2008"
  xmlns:mc="http://schemas.openxmlformats.org/markup-compatibility/2006"
  mc:Ignorable="d"
  d:DesignHeight="600" d:DesignWidth="500">

  <Grid x:Name="LayoutRoot" Background="White">
    <my:RadScheduler Name="schedule" ViewMode="Day" IsReadOnly="True">
      <my:RadScheduler.DayViewDefinition>
        <my:DayViewDefinition
DayStartTime="07:00:00" DayEndTime="19:00:00"
          TimeSlotLength="0:30:0"/>
      </my:RadScheduler.DayViewDefinition>
    </my:RadScheduler>
  </Grid>
</UserControl>
|
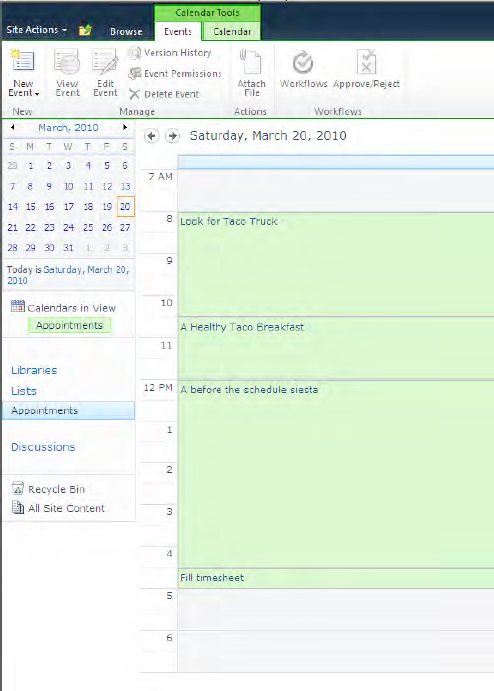
Now before we can start writing the code for
code-behind, let's create some sample data first. The sample data is
simply going to be a SharePoint list based on the calendar template. I'm
going to call this list Appointments and add a few sample appointments in there. My list looks like Figure 3.
Next let's start writing the code for the code-behind. The code for the code behind can be seen in Listing 8.
Example 8. MainPage.XAML.cs Code
public partial class MainPage : UserControl
{
  private IEnumerable<ListItem> appointments = null;

  public MainPage()
  {
    InitializeComponent();
    this.Loaded += new RoutedEventHandler(MainPage_Loaded);
  }

  void MainPage_Loaded(object sender, RoutedEventArgs e)
  {
    ClientContext context = ClientContext.Current;
    CamlQuery camlQuery = new CamlQuery()
    {
      ViewXml = "<Query><OrderBy><FieldRef Name='EventDate'/></OrderBy></Query>"
    };
    var query = from item in context.Web.Lists.GetByTitle("Appointments").GetItems(camlQuery)
          select item;
    appointments = context.LoadQuery(query);
    context.ExecuteQueryAsync(succeededCallBack, failedCallback);
  }

  void succeededCallBack(object sender, ClientRequestSucceededEventArgs e)
  {
    this.Dispatcher.BeginInvoke(() =>
        {
          foreach (var appointment in appointments)
           {
            schedule.Appointments.Add(new Appointment()
              {
                Subject = appointment.FieldValues["Title"].ToString(),
                Start =
Convert.ToDateTime(appointment.FieldValues["EventDate"]).ToLocalTime(),
                End = Convert.ToDateTime(appointment.FieldValues["EndDate"]).ToLocalTime(),
                Body = appointment.FieldValues["Description"].ToString()
              }
            );
                }
        }
      );
  }

  void failedCallback(object sender, ClientRequestFailedEventArgs e)
  {
    MessageBox.Show(e.ErrorDetails.ToString(), "Error", MessageBoxButton.OK);
  }
}
|
As you can see from Listing 8,
in the MainPage_Loaded method, I'm getting a handle to
ClientContext.Current. Then using the ClientContext and the LoadQuery
method, I'm executing a query asynchronously to fetch the items out of
the appointments list sorted by EventDate. In Silverlight and
JavaScript, I have to call ExecuteQuery methods asynchronously. Then in
the succeededCallBack, I'm creating an instance of the object that I can
add to the RadScheduler instance declared earlier in my XAML in Listing 8. In the failedCallback, I'm simply showing a message box with the error message.
Now go ahead and build and deploy your project, and
drop an instance of the SchedulerWebPart on the home page of your site.
You should see the WebPart running in action as shown in Figure 4.
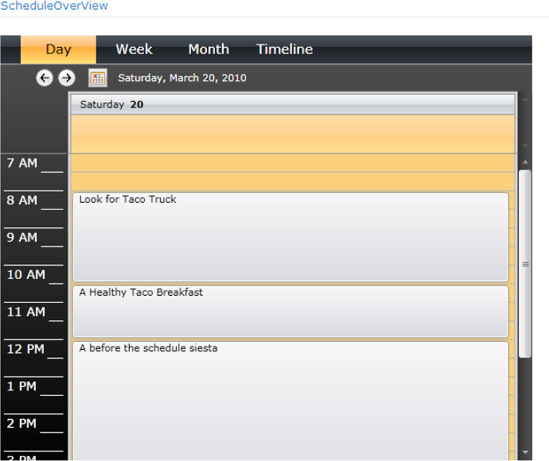
Thus by using Silverlight and the Client object
model, I'm able to read the various list items and display them in a
visually appealing manner.
Next, I'm going to demonstrate the loading of a
single appointment or a single list item, given the ID of that list
item. I will do so using JavaScript consuming the client object model.
And then eventually I will connect these two WebParts
in a postback-free manner, so a selected appointment from the
Silverlight WebPart can show its details in the JavaScript WebPart.